Eneco Belgium is a sustainable energy provider focused on delivering 100% green electricity and offering innovative energy solutions for homes and businesses, aiming to accelerate the transition to a carbon-neutral future.
Installation of the Eneco Controller
1. Preparation
Before you start, make sure you have the following:
- Eneco Controller
- Power Supply
- Ethernet Cable (Not delivered with the controller)
- P1 to USB Cable (Delivered with the controller)
- Laptop for configuration
- Basic tools for installation
- HomeWizard P1 Dongle (Not delivered, will be used if the Smart Meter is too far from the controller)
Depending on the installation it could also be useful to have the following:
- DIN Rail Mounting Kit
- Extension Chord
- Ethernet Switch
The following should be available on site:
- Ethernet Connection
- Power Connection
- Smart Meter
The P1 Port on the Fluvius Smart Meter needs to be activated, make sure this is done before the installation.
This can take up to 3 days!
2. Installation
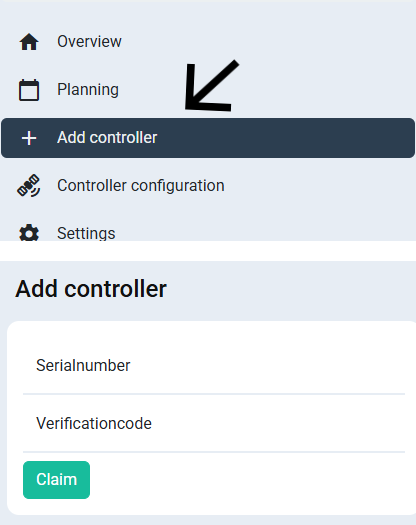
Before installing the controller make sure to claim it in the Eneco Portal
To claim the controller, follow these steps:
- Go to the Eneco Portal
- Log in with your installer credentials
- In the menu select "Add Controller"
- Enter the serial number of the controller
- Enter the verification code of the controller
- Click "Claim"
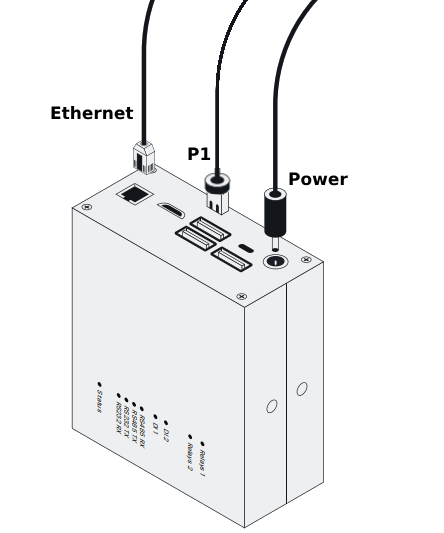
Install the controller
- Connect the controller to the power supply
- Connect the controller to the internet using the Ethernet cable
- In the menu select "Add Controller"
- Connect the controller to the smart meter using the P1 to USB cable or the HomeWizard Dongle
- Wait for the controller to boot up
- The controller is now ready for configuration
You can check the status of the Eneco Controller by the color of the status LED:
- Booting
- Ready
- Error
3. Configuration�
You can easily connect to the configuration page following the following steps:
- Go to the Eneco Portal
- Log in with your installer credentials
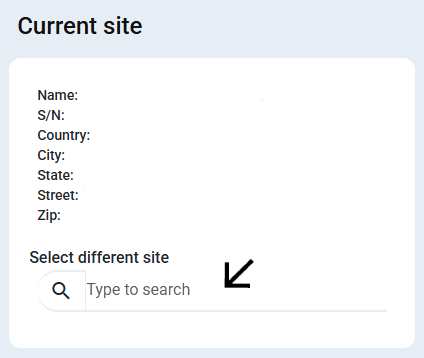
- In the menu select "Settings"
- Under "Current site" select the serial number of the installed controller
- In the menu click "Controller Configuration"
Once you are in the configuration interface follow the following steps:
- Log in using your installer credentials
- Click start on the setup wizard
- Fill in the Current (A) of the main circuit breaker
- Select the correct grid type (single phase, three phase wye or delta)
- Fill in the correct power and current limits.
The import limit can be set to past year's average power consumption. If it is a Belgian site, then you can fill in the power as used in your capacity tariff calculations of the past year. - Click next on the page with the default working modes.
- Leave the data saver off
- Fill in the address of the customer's house and click validate
- Click finish setup wizard
The import limit can be set to past year's average power consumption. If it is a Belgian site, then you can fill in the power as used in your capacity tariff calculations of the past year.
For more information on the limits click here
You should always connect the energy meter directly to the controller, not to the inverter. Connecting the energy meter to the inverter can cause control problems, especially if your site has many different kinds of devices to control.
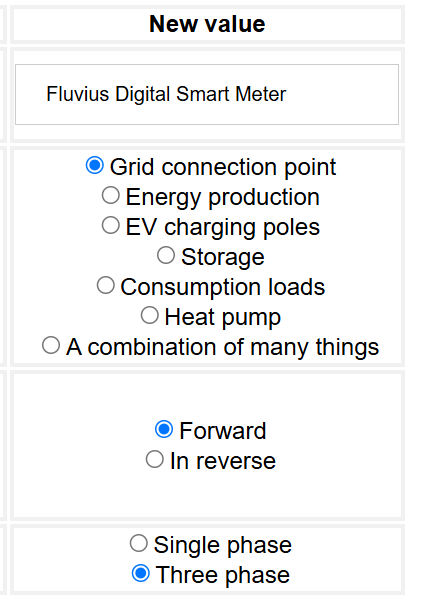
Now that the basic configuration has been done you can add the Smart Meter:
- Select "Devices" in the menu
- Start the device wizard
- Choose "Energy Meters"
- Select "Fluvius"
- Select "P1 port USB cable"
- When asked for a device type/protocol select "P1 port DSMR 4.2/DSMR 5"
- Click "Search"
- Click "End scan and go to results"
- Select "Save and go to device settings"
- Fill in the correct settings and click save
After adding the Smart Meter we can now add the hybrid inverter:
- Select "Devices" in the menu
- Start the device wizard
- Choose "Solar inverter" or "Battery systems"
- Select "Sigenergy/Energreen" from the list of brands
- Select "Ethernet TCP" and click "Next"
- Select "SigenStor" and click "Next"
- Open "Option 1. Add by MAX address"
- If no devices are listed click "Refresh table"
- Click "Select" next to the MAC address of the inverter
These inverters are usually listed as "Espressif Inc."
- Click "Search"
- Click "End scan and go to results"
- Click "Save and go to device settings"
- Fill in the correct settings and click save
Make sure to enable "Modbus TCP" in the Sigenergy/Energreen app.
For correct battery control the control mode should be set to "External Control"
Make sure the Energreen battery is installed WITHOUT meter and no grid export/import limits have been set.
4. Final steps
We want to control the battery inverter based on the prices provided by Eneco
- Select "External data sources" in the menu
- Click "Start wizard"
- Select "External Signal"
- Select "Eneco"
- Fill in the necessary information and click "Save"